
Step 2: Setup Salesforce Campaigns
In this section you will learn how to:
- Modify campaign picklists
- Create custom fields
- Modify page layouts
- Customise list views
- Setup campaign influence
Modify Campaign Picklists
Modify the values in the campaign picklist to suit your business. You should at least modify the ‘Type’ and ‘Member Status’ values to reflect your business needs.
Step 1: Go to Setup, enter campaigns in the Quick Find box then click on Fields.

Step 2: Click on the picklist field you want to modify.
![]()
Step 3: Add New, Edit or Delete a picklist value and Save.

Create Custom Fields
If you have identified you need additional fields adding. Follow the steps below:
Step 1: Go to Setup and enter campaigns in the Quick Find box, then select Fields.
Step 2: Click New in the Campaign Custom Fields section of the page (you may have to scroll down to see this)
 Step 3: Follow the wizard to create the custom fields.

Modify Page Layouts to display the ‘Campaign History’ List
To enable your sales people to track campaign responses, you will need to modify the contact and lead page layouts to display the ‘Campaign History’ list and campaign fields and modify the opportunity page layout to display the ‘Campaign Influence’ list and campaign fields.
To modify page layouts:
Step 1: Got to Setup and enter leads/contacts/opportunities in the Quick Find box, then click Page Layouts, then select Edit.

Step 2: Select the Campaign History from the related list and drag it to the Page Layout and Save.

Customise Campaign List Views
List views provide quick access to campaigns based on specific criteria. For example, you might create a list view to show all direct mail campaigns.
To create a custom list view:
Step 1: Navigate to the Campaigns tab, select Create New View.

Step 2: Give the list a name. 
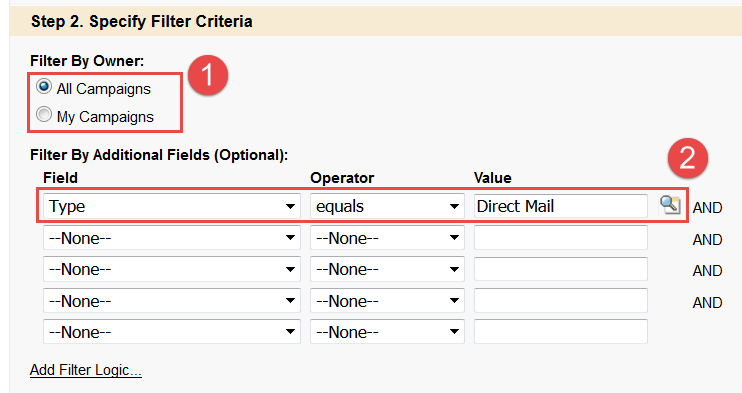
Step 3: Select All Campaigns or My Campaigns to restrict the list to campaigns owned by the user viewing the list.
Set the criteria for the list, for example: Type equals ‘Direct Mail’ to view all direct mail campaigns.
 Step 4: Select the fields to display in the list view. You can choose any standard or custom campaign fields.

Step 5: Set the visibility to: Visible to all users to make the list view public and save.

Setup Campaign Influence
In salesforce you can associate multiple campaigns to an opportunity. If automatic association is not enabled, you must manually add, edit or delete influential campaigns in the related list.
To setup automatic association for campaign influence:
Step 1: Go Setup, type campaign influence in the Quick Find box, then select Campaign Influence. Select Enabled.

Step 2: In the Campaign Influence Time Frame Field, you can specify the number of days between the campaigns first associated date and opportunity created date.

Step 3: Optionally, you can set criteria that must be met for a campaign to be associated automatically and save.

Step 3: Run your Salesforce Campaign
Follow these 5 steps to manage your Salesforce campaigns successfully:
- Create a campaign in Salesforce
- Create a list of individuals you want to target
- Run the campaign
- Track responses
- Create reports. Analyse effectiveness
Create a campaign
You’ve got our marketing strategy, now let’s put it into action by creating a campaign in Salesforce.
Step 1: Navigate to the Campaign Tab, select New.

Step 2: Complete all the necessary fields and save.

Creating Target Lists
To target existing leads or contacts:
Step 1: To create a custom select the Reports Tab, then select New Report.

Step 2: Select report type Leads, then click Create.

Step 3: In the Filters, enter the criteria to segment the data.

Step 4: For example: To target all Directors at a technology company with annual revenue greater than £500,000, you would enter the following criteria:
- Title equals Director
- Industry equals Technology
- Annual Revenue greater than £500,000

Step 4: Use the Quick Find box to quickly find the headings you want to include in the report (Name, Title, Company etc.). Drag the headings to the preview section, then click Run Report.

Step 5: Click Add to Campaign.

Step 5: Select the campaign you want to add the contacts to and set the Member Status value, then click Add to Campaign.

Executing a campaign
Campaigns are executed either online or offline
- Online campaigns
- Email Blasts
- Google AdWords
- Webinar/Event Registration
- Offline campaigns
- Trade Show
- Print or Radio Adverts
- Direct Mail
Tracking Responses
There are mainly four types of responses, Online, Manual, Mass Update and Offline.
Online Responses
Prospects respond by filling in a form on your website.
Use the Salesforce Web-to-Lead wizard to create a landing page for the campaign. Make sure to include the Campaign ID field.
All form submissions are created as leads in Salesforce and will be associated with the relevant campaign.
To find the campaign ID, select the Campaign tab and select the Campaign you created.

The last 15 digits in the URL represent the campaign ID.
![]()
Manual Update
Prospects who phone or email in response to a campaign.
To track these responses, you will have to manually update the Campaign History for the lead or contact in Salesforce.
Open the lead or contact details of the prospect, in the Campaign History section click on Add to Campaign.

Mass Update
Method 1
To track these responses, a person with the appropriate permissions can run a custom lead or contact report and click ‘Add to Campaign’ to select a new status for those campaign members.
Method 2
Select the Contacts or Leads tab, select a list view and click Add to Campaign.

Offline Response
Track trade shows or email responses from an outsourced marketing company.
To track these responses, use the campaign Member Import option to import the offline list.
Select the Campaign tab, select the campaign you want to add or update prospects.

Analyse Campaign Effectiveness
Analyse the effectiveness of your campaigns with reports and campaign statistics. Track information such as number of leads generated, opportunities associated with a campaign, revenue generated from the campaign and a lot more.
Track campaign statistics over time such as number of times a contact responded to campaigns and return on investment of campaigns. With campaign influence you can see how campaigns are contributing to opportunities.
Review Campaign Statistics
Calculated automatically every time a campaign is saved. Information such as responses, number of opportunities and amount of won opportunities are included.
Run Campaign Reports
You can run a number of reports such as:
- List leads or contacts associated with a particular campaign
- Campaign Member Analysis to summarise information about who has responded
- Campaign Revenue Report to analyse which opportunities have been won as a result of a campaign
- Campaign ROI Analysis to calculate the ROI and average cost for any campaign. ROI = (Total Value Opportunities – Actual Cost)/Actual Cost. ROI is a shown as a percentage
- Campaign Influence to view opportunities that are influenced by each of the campaigns
- Campaign Member report to view the members of a campaign